
Guide to Harvesting Carrots at the Right Time
Growing your own carrots can be an incredibly rewarding experience, offering a fresh and crisp addition to your culinary creations. These vibrant vegetables, however, require attention to detail and an understanding of their growth cycle in order to determine the opportune moment for harvest. In this discussion we delve into the typical carrot cultivation process, the signs indicative of mature carrots ready for harvest, as well as the disparities that can occur based on type and growing conditions. We also elucidate how monitoring the condition of your carrot tops and soil can provide ample insight into their readiness. Lastly, mastering the complexities of harvesting and storing carrots ensures their continued freshness, and we provide you with expert techniques to make this a seamless process.
Understanding Carrot Growth Cycle
Unearth the Wonders of the Carrot’s Cycle: From Seed to Harvest
Marvel at the beautiful symphony of nature’s processes when you immerse yourself in the fascinating world of carrots. There’s an incredible journey that happens right beneath the soil’s surface, begging to be discovered by anyone willing to invest time, care, and passion. Let’s delve into the intriguing growth cycle of a carrot: a favorite of both gardeners and foodies alike.
Starting the Cycle: Planting the Seeds
Kickstart this fascinating voyage with a simple yet crucial step – planting the seeds. Typically done in the late spring or early summer, the seeds should ideally be started indoors several weeks prior. Sprinkle carrot seeds generously over the soil in shallow furrows, about two to three inches apart from one another. This ensures every seed gets a fighting chance at life without too much competition.
The First Sprouting
Roughly two weeks after planting, you’ll witness the magic unfold. The embryonic leaves, also known as cotyledon, break through the soil surface. Remember, they’re thirsty, so keep the soil evenly moist – vital for seed germination. Patches of delicate green sprouts appear, the first sign of your carrots quietly growing underground.
Emergence of the True Leaves
Next, the true leaves emerge around the fourth week. This second set of leaves more closely resembles the carrot’s mature foliage. The plant’s food-making process, photosynthesis, kicks into high gear, and the plant begins to form its orange root.
An Underground Marvel: Root Development
Now comes the marvel of nature’s underground handiwork. From weeks eight through fourteen, your carrots undergo rapid root development. Though unseen, the carrot taps into the nutrients underground and enlarges. The root elongates and forms distinct shoulders that we all know and love.
Bringing the Cycle Full Circle: Harvest Time
Patience is a gardener’s best friend, especially when growing carrots. Approximately seventy to eighty days post-planting, your hard work pays off. A tiny tug on the delicate green tops indicates whether your carrots are ready for harvest. If they resist even slightly, they’re letting you know they need more time to grow.
Understanding a carrot’s growth cycle is essential for anyone passionate about gardening or simply curious about the journeys of our everyday vegetables. These are the key steps, broken down in the simplest terms, to help others join in on the captivating world of carrot growing.
Now, armed with the knowledge of the carrot’s fascinating path from seed to harvest, the only question left is – are you ready to witness this underground marvel for yourself?

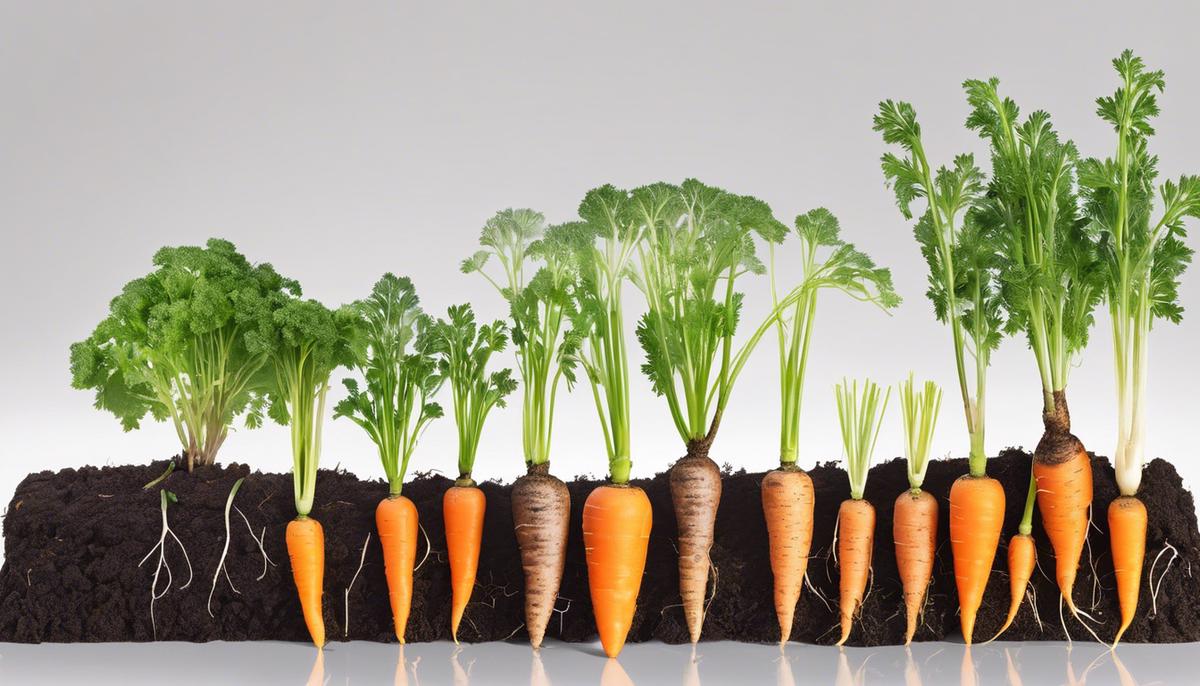
Inspecting Carrot Tops and Soil
Discerning When to Harvest: Carrot Tops and Soil Signs Revealed!
The thrilling process of growing carrots from tiny seeds is a testament to the wonders of nature and the patience of every garden hobbyist. Carrots give us a unique challenge – they ripen underground, hidden from sight. However, this enticing mystery isn’t without clues. Let’s delve into an exciting topic: interpreting carrot tops and soil conditions to know the optimal harvesting time.
First, an understanding of the carrot’s anatomy is key. The edible part we all adore is the taproot, which bulges as the plant grows. But what signals does it give us from beneath the soil? A glance at the tops and the surrounding soil helps us crack this underground code.
The foliage, or ‘tops,’ of the carrot plant isn’t just pretty to look at. It serves as an invaluable indicator of the mysterious activity happening beneath. Carrot tops, known as fronds, become more bushy and vibrant as the plant matures. This foliage reaching its peak of lushness signals that the carrot is almost ready for harvest.
Color is another vital clue. Look out for a vibrant, dark green. If the fronds start to yellow or wilt, that’s not a sign of readiness, but of a stressed plant. Ensure your carrots are properly watered and nourished if that’s the case. A carrot’s foliage is a living billboard, signaling the state of the growth happening beneath the soil.
Subtle shifts in the soil to are another powerful harvesting hint. The soil will mound slightly around a ready-to-harvest carrot. You’ll notice a faint circular elevation in the soil around the base of the green top. PS, it gives nothing away, you have to keep an eye out.
In addition to the mounding, the top of the carrot itself can start peeking out from the soil. If you spot a gentle orange curve, it’s an excellent chance your carrot is ready for harvest. However, don’t pull them out just yet! The size of the exposed carrot portion is notoriously misleading. A gardening fork gently loosened around the carrot will provide an accurate gauge of the carrot’s true size.
One final caveat – refrain from compulsive tests. A few ‘test harvests’ are okay, but constant digging can disturb root development of neighboring plants, so use this technique sparingly.
Interpreting these signals channels the artistry of gardening. Experience is the finest teacher, and soon you’ll understand your carrot crop just by scanning the tops and soil. And the reward? A bountiful harvest of delicious, crisp carrots, grown to perfection by your own hand. Happy carrot harvesting, dear gardeners!

Harvesting and Storing Carrots
Ready to go beyond the basics of carrot cultivation and delve deeper into the specifics of harvesting and storing this popular root veggie? Let’s get started!
To begin, familiarize yourself with the ideal harvesting time. While it may be tempting to remove your carrots from the ground as soon as you see the tops peeking out, practicing restraint can lead to bigger and chunkier carrots. Medium to large-sized carrots are typically ready for harvest 70 to 80 days post the cotyledon leaves emergence. However, remember that harvesting isn’t a concrete date on the calendar; it’s more about recognizing the signs.
When you predict that it’s harvest time, gently remove one of the carrots to see whether it’s grown to a reasonable size. If it is too small, cover the sample carrot back up with soil and provide it a few more days of growth. When the sample meets your preferred size, it’s time to round up the entire carrot troupe.
The optimal way to harvest without damaging this delicate root is by using a gardening fork. Start by loosening the soil around the carrot. Once loosened enough, get a firm grip on the foliage clump at the top of the carrot, and gently pull it straight up. Be patient during this process as rushing might lead to carrot breakage.
Now, let’s switch gears and talk about storage. Carrots stay good for only a few days at room temperature, so refrigeration is key for longer storage periods. Before tossing the carrots into the fridge, it’s important to get rid of excess moisture by patting them dry. Leaving the greens attached can lead to moisture loss, making the carrots limp, so always remove them before storing.
Store your harvested carrots in a perforated plastic bag in the vegetable drawer of your refrigerator. Creating a humid environment can drastically increase their longevity. A moisture-filled crisper drawer gives your carrots a perfect home where they can rest for about a month, sometimes more, without losing their much-loved crunchiness.
Freezing carrots can also extend their shelf-life. To freeze, blanch the carrots in boiling water for a few minutes, then plunge them into ice water. This process, known as blanching, helps preserve their vibrant color and taste while also neutralizing the enzymes that cause aging. Once blanched, allow the carrots to cool before packing them into airtight freezer bags.
Therefore, while harvesting and storing carrots may seem complex at first, with some practice, patience, and persistency, it becomes second nature. The process has its own rhythm and flow to it that transforms from an activity into an art form. Happy carrot harvesting!

Harvesting and storing your carrots at the right time can greatly enhance their taste and longevity. After becoming familiar with the signs of carrots ready for harvest – be it changes in the size and color of the tops, or the condition of soil – and mastering efficient harvesting techniques, you are well on your way to enjoying home-grown, fresh, and flavorful carrots. The knowledge gained provides crucial insight not only into the process of carrot cultivation, but also into the fulfilling endeavor of growing your own food. With these practical tools and understanding garnered, we hope that you feel empowered to optimize your gardening efforts, and reap bountiful, quality carrots.


