
Harvesting Carrots: Tips to Get it Right

In the vast world of gardening, understanding the life cycle of your plants is key to a fruitful harvest. This concept especially holds true for those wanting to successfully harvest a bounty of delicious carrots. Carrots, like other vegetables, undergo specific growth stages and recognizing these stages can make a tangible difference in terms of harvesting success. However, knowing when your carrots are ripe for the taking involves more than just understanding their growth cycle. It’s about being able to physically recognize when these underground treats are ready to be brought to light. Additionally, once your carrots have reached that prime stage, harvesting them properly ensures that you maintain their health and taste, all while leaving the minimum disturbance to the earth’s surface where they grow.
Understanding Carrot Growth Cycle
Stages in the Growth Cycle of a Carrot: A Hobbyist’s Guide from Seed to Harvest
Ah, carrots! Those wonderful, vibrant vegetables that taste as good as they look and are packed with vitamins. But have you ever wondered about the growth cycle of a carrot? Understanding this cycle can significantly unlock your potential as a carrot hobbyist. So, let’s dig deep and explore the fascinating stages of the growth cycle of a carrot.
Stage One: Germination
Fun fact: a carrot starts life as a tiny seed not much larger than a grain of sand. Once that seed is sown into well-prepared, loose, and fertile soil, the journey begins. Germination happens when the temperature reaches an optimal 50–85 degrees Fahrenheit. In about 14-21 days, green shoots break ground, indicating that germination is complete.
Stage Two: Seedling Growth
The next several weeks focus on the seedling growth. Now visible above the ground, tiny seedlings begin to sprout leaves and, beneath the surface, a thin root. It’s crucial time for our baby carrots, which need careful watering and thinning. Thinning is essential for preventing crowding, allowing each carrot to have enough space to grow to its maximum size.
Stage Three: Root Development
After six to eight weeks, the real magic happens beneath the surface. The thin root from the seedling stage starts to expand and form the characteristic shape we all recognize. This is the primary growth stage of the carrot and the most exciting. The color changes from a pale, almost translucent hue to a vibrant orange. The root also accumulates its distinctive sweet flavor during this phase.
Stage Four: Maturation
In roughly 2-4 months, the carrots reach their peak growth. The top green foliage will appear lush and deep green, and the roots are fully developed. You can tell if your carrot is ready for harvesting if you lightly brush away the dirt at the top of the root; if it’s roughly three-quarters of an inch in diameter, it’s ready! Another tell-tale sign is if the carrot’s shoulders are slightly protruding above the soil.
Stage Five: Harvesting
The joy of being a carrot hobbyist culminates in the harvesting stage. The pure satisfaction of pulling a fully grown, vibrant carrot from the ground after months of patient care is a feeling like no other. Gently tug upwards from the base of the leaves and voila! An excellent tip here is not to let your carrots over-mature, as they can become woody and lose their sweet taste.
So there you have it, a comprehensive guide to the different stages in the growth cycle of a carrot. From the time the seed hits the soil to the moment your homegrown, fresh carrots are on your dinner table, each stage is a testament to the wonders of nature and the rewards of an engaging hobby. Happy gardening, carrot hobbyists!

Recognizing Ready-to-Harvest Carrots
Deciphering The Ripe Time: Indicators to Harvest Carrots
Enthusiastic about growing your very own carrots in your backyard garden? That’s fantastic! Carrots are one of the simplest vegetables to grow, offering a plethora of health benefits wrapped in a vibrant, crunchy package. Of course, the trickiest part of growing any vegetable might just be knowing when it’s ready to harvest. Fear not, green-thumbs. This article is here to discuss the key indicators, guiding you to the ripe moment to harvest your homegrown carrots.
Observing the Top
A visible part of the carrot, the top foliage, is the first signpost to analyze. While it’s not an absolute indication of a mature carrot, if the leaves are looking lush, vibrant, and strong, it’s generally a good sign that the carrot is developing well. Keep in mind, though, that a carrot’s size, not its foliage’s vibrancy, is the true indicator of its readiness for harvest.
Peeking at the Crowns
When the crowns of the carrots begin to pop out of the soil, it is typically an indication that they’re nearing readiness for harvest. The crown of the carrot (the top portion of the root) will be a clear orange color and roughly about the diameter of a penny or nickel.
Checking the Calendar
Timing can be a reasonably accurate indicator of when your carrots are ready for harvest. Most carrot varieties are ready to harvest 60-75 days after planting. Of course, smaller carrot varieties may mature earlier, while larger varieties, like the Imperial types, might take a little longer.
Test Harvesting
Arguably the most fail-safe method of determining if your carrots are ready to harvest is simply to pull one out and evaluate it. Choose a carrot in one corner of your garden as your tester. This should give you an indication of how ready the rest of the crop might be. If the tester carrot is undersized or not fully colored, wait a few more days before checking again.
Remember that carrots can be left in the ground after maturing, which allows plenty of flexibility when it comes to harvesting time. They can tolerate light frost, which sometimes even enhances their flavor by turning the starch into sugar. However, try not to leave them in the ground too long, as over-ripe carrots can become woody and unpalatable.
In the end, the best teacher is experience, and through trial and error, you will soon master the art of knowing when your carrots are ripe for the picking. Here’s to bountiful carrot harvests and the joy they bring!
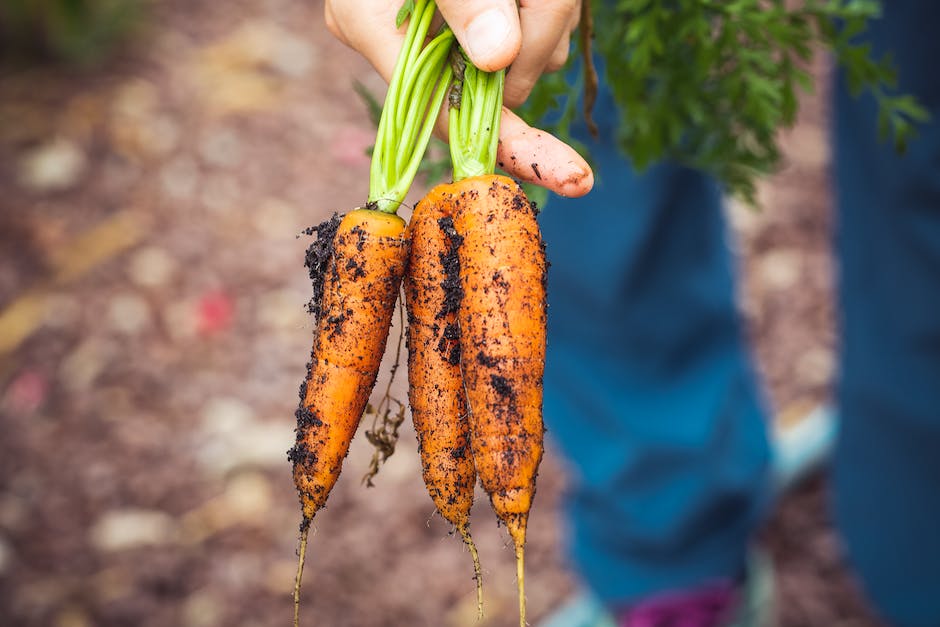
Proper Harvesting Techniques
As you already know, successfully harvesting your carrots is just as important as the previous steps of germination, seedling growth, root development, and maturation. Tackling this crucial stage with the right techniques will ensure the quality and integrity of your produce. It’s important to be gentle, patient, and precise when pulling carrots out to avoid any damage that might reduce their quality or storage life.
The first technique is all about using both hands properly. One hand should be used to hold the top with a firm but gentle grip, while the other hand should be firmly placed on the surrounding soil. This will help you retrieve the carrot with minimal soil disruption and the least damage to the roots. Always remember to pull straight up! A twisted or sideways pull can often snap the carrot leaving a portion of it still buried.
Next, let’s talk about the soil. Loosening the soil around the carrot can significantly reduce the risk of breaking them during the harvest. One can use a garden fork or a broad, flat trowel for this purpose. Take care to insert this tool well away from where you think the carrot might be to avoid driving it directly into a carrot.
Moistening the soil just before harvesting can also be beneficial. By slightly watering your carrot bed, you make the soil softer and easier for the carrots to slide out of. However, avoid completely soaking the soil as it can lead to a dirty harvest and increase the chances of bruising or damage.
A useful tip is to plant carrots in raised beds or rows. This approach not only enhances the quality of the carrots but also makes them easier to harvest. Harvesting in raised beds reduces the risk of encountering rocks or hard clumps of soil that may hinder the carrot’s smooth exit.
Lastly, after harvesting, it is essential to maintain your carrots properly. Cut off the leafy tops as this reduces water loss and helps the carrot stay crisp longer. But make sure you leave about a half-inch of green stub at the top because, without it, the top of the carrot may turn green and bitter. Don’t wash them right away either! Brush off any excess dirt and postpone washing until they’re about to be consumed, as washing can strip off their protective coat and shorten their shelf life.
And there you have it: the art of carrot harvesting! Remember that each carrot is different and may need individual attention, so give them the love they need to be the best they can be. Enjoy the fruits (or in this case, roots) of your labor!

The journey from sowing carrot seeds to finally serving them on a dinner plate can be both exhaustive yet rewarding. However, to fully savor the taste of hard work and perseverance, it matters how accurately you gauge the readiness of your carrots and how delicately you pull them out of their earthy beds. Remember, understanding the signals of a ready-to-harvest carrot is as essential as knowing the adequate procedures to harvest them. It’s not just about achieving a successful harvest, it’s also about protecting and preserving the soil where they grow, making it conducive for future vegetable gardening adventures. By diligently attending to these diverse aspects of harvesting, one can revel in the joy of growing and picking the freshest, most flavorful carrots straight from their own backyard.


